[vc_row el_class=”main-ppp”][vc_column width=”9/12″ el_class=”pages-contenu”][vc_column_text]
Getting Started With Your Home Sleep Test
Dorma uses the Respironics Alice NightOne device for home sleep tests. Below we will outline how to use the device including frequently asked questions
The Testing Device
Dorma has sent you a case with everything you need for your Home Sleep Test (HST). The case will include an “Alice NightOne device”.
This is a rectangular device that will keep track of your body position (such as if you’re lying on your back, side, or stomach). It will also store all the information from your HST.
The case will also have a user manual and quick start guide. Follow the safety instructions in the user manual and please don’t get the Alice NightOne device or sensors wet.[/vc_column_text][vc_video link=”https://youtu.be/Witp7UfW1Yo”][vc_row_inner][vc_column_inner][vc_column_text]
Getting Started
Your home sleep test has 3 sensors to setup before you go to bed.
[/vc_column_text][/vc_column_inner][/vc_row_inner][vc_row_inner][vc_column_inner width=”1/3″][vc_column_text]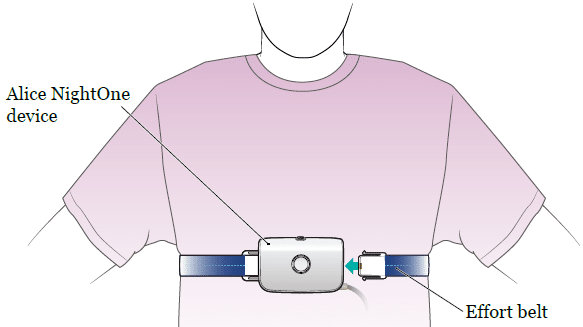
Effort Belt
This is a belt you’ll wear around your chest. It will measure how hard your lungs are working.
One end of the effort belt should already be attached to the testing device.[/vc_column_text][/vc_column_inner][vc_column_inner width=”1/3″][vc_column_text]
Nasal Cannula
This is a thin, flexible tube that you’ll place under your nose.
It will measure how much air you’re breathing and keep track of your snoring.[/vc_column_text][/vc_column_inner][vc_column_inner width=”1/3″][vc_column_text]
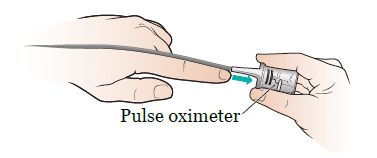
Pulse Oximeter
This is a wire with a gray rubber sensor that you’ll place on your finger.
It will measure your pulse, blood flow, and the amount of oxygen in your blood. The pulse oximeter should already be attached to the testing device.[/vc_column_text][/vc_column_inner][/vc_row_inner][vc_column_text]
Putting On The Sensors
Wear a loose-fitting top (such as a t-shirt) on the night of your HST. Once you’re ready for bed, put the sensors on as directed below. Put them on while you’re standing or sitting up, not lying down[/vc_column_text][vc_row_inner][vc_column_inner width=”1/2″][vc_column_text]
[/vc_column_text][/vc_column_inner][vc_column_inner width=”1/2″][vc_column_text]
Effort belt
1. Wrap the effort belt around your chest so the Alice NightOne device is in the center of your chest (see Figure 3). The effort belt should be evenly across your nipples or above your breasts. The belt should be snug but not too tight.
2. Plug the loose end of the effort belt into the Alice NightOne device (see Figure 3). After the effort belt is connected, the good study indicator will blink green as the device automatically turns on and starts recording.
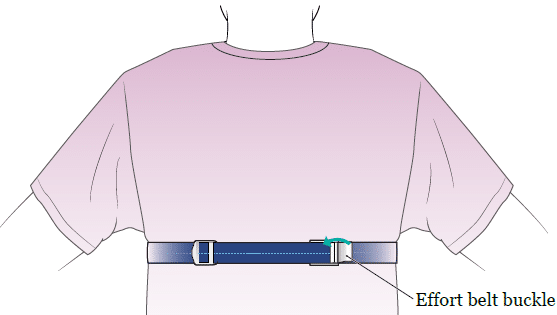
3. Once the device is turned on, the effort belt icon will appear. It will probably be flashing yellow. Use the buckle on the effort belt to adjust the belt so it’s snug but not uncomfortable (see Figure 4).
4. Take several breaths with the belt connected. The effort belt icon on the device should turn green. If it doesn’t, check the position and snugness of the belt. Then, take a few more breaths and check the icon again.
Once the effort belt icon turns green, put on the nasal cannula. The nasal cannula icon will appear to remind you.[/vc_column_text][/vc_column_inner][/vc_row_inner][vc_row_inner][vc_column_inner width=”1/2″][vc_column_text]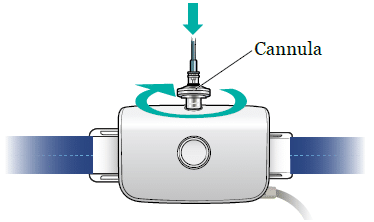
 [/vc_column_text][/vc_column_inner][vc_column_inner width=”1/2″][vc_column_text]
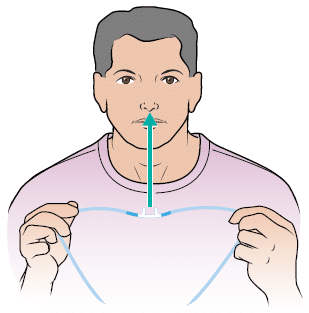
Nasal Cannula
1. Twist the cannula clockwise (to the right) to connect it to the top of the Alice NightOne device (see Figure 5).
2. Hold the nasal cannula tube in front of your face. Check that the prongs on the tube curve slightly toward you. Then, gently place the prongs into your nose (see Figure 6). One prong should go into each nostril.
3. Loop the nasal cannula tube over each of your ears and under your chin. Move the slider on the tube up so the tube is snug under your chin (see Figure 7).
4. Take several breaths with the nasal cannula in place.
The nasal cannula icon on the device should turn green. If it doesn’t, make sure the prongs are inside your nostrils. Breathe through your nose for 10 seconds, then check the icon again.
Once the nasal cannula icon turns green, put on the pulse oximeter. The pulse oximeter icon will appear to remind you.[/vc_column_text][/vc_column_inner][/vc_row_inner][vc_row_inner][vc_column_inner width=”1/2″][vc_column_text]
[/vc_column_text][/vc_column_inner][vc_column_inner width=”1/2″][vc_column_text]
Pulse Oximeter
1. Put the rubber sensor on one of your index (pointer) fingers (see Figure 8).
-
- The pulse oximeter only works on a natural, clean nail. If you have fake nails or are wearing nail polish, take it off before putting the pulse oximeter on.
- Place the sensor so the wire goes over the back of your hand.
2. Take several breaths with the pulse oximeter in place. The pulse oximeter icon should turn green. If it doesn’t, check the position of the sensor. Make sure it’s securely in place. Then, take a few more breaths and check the icon again.[/vc_column_text][/vc_column_inner][/vc_row_inner][vc_separator][vc_separator][vc_column_text]
About The Alice NightOne Icons
[/vc_column_text][vc_row_inner][vc_column_inner width=”1/2″][vc_column_text]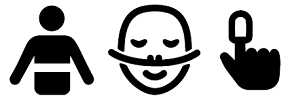
The top of the Alice NightOne device has 4 icons that light up to give you information.
If these icons are green, it means the sensors are connected and working properly. If one of these icons is flashing yellow, it means that sensor needs to be connected or adjusted.
It may take a few seconds for the icon to change from yellow to green after you connect or adjust a sensor.[/vc_column_text][/vc_column_inner][vc_column_inner width=”1/2″][vc_column_text]

The good study indicator (see Figure 2) can tell you how much of the data from your HST is good quality.
It also tells you when the Alice NightOne device is turning on or off.
The 4 parts of the good study indicator can light up separately.[/vc_column_text][/vc_column_inner][/vc_row_inner][/vc_column][vc_column width=”3/12″ el_class=”pages-sidebar”][vc_cta h2=”Questions About Your Home Sleep Test?” add_button=”bottom” btn_title=”Contact Us” btn_link=”url:https%3A%2F%2Fdormalab.com%2Fcontact-us%2F|title:CPAP%20Rental%20%26%20Purchase||”]Call 1-855-218-5186. Our team of trained sleep specialists are here to answer any questions you may have.[/vc_cta][vc_widget_sidebar sidebar_id=”pages_sidebar” el_class=”sidebar”][/vc_column][/vc_row]